
Introduction to Baked Taco Dip
When it comes to effortless entertaining or a quick evening snack, baked taco dip is a game-changer for young professionals. Picture this: you’ve just wrapped up a long day at work, and all you want is a deliciously satisfying meal without spending hours in the kitchen. This dip combines comfort food with convenience, making it the perfect go-to option.
Why Baked Taco Dip is a Game-Changer for Young Professionals
Baked taco dip is not only easy to make, but it also allows for flexibility. With simple ingredients like cream cheese, ground beef, salsa, and cheddar cheese, you can whip up a crowd-pleaser in under 40 minutes. Plus, it's an inviting dish for that casual gathering with friends or game night — just serve it with tortilla chips, and you’re good to go!
Want to take it up a notch? You can customize it with your favorite toppings, like guacamole or fresh jalapeños. This dip is also a fantastic way to meal-prep; make a larger batch and enjoy it throughout the week. The possibilities are endless!
So, whether you're hosting or just need an easy dinner option, keep baked taco dip in your arsenal. You’ll find it meets the demands of your busy lifestyle while still delivering incredible flavor. For more entertaining ideas, check out resources from the American Culinary Federation.
Ingredients for Baked Taco Dip
Essential ingredients for a flavor-packed dip
When it comes to crafting the perfect baked taco dip, having the right foundational ingredients is crucial. Here’s what you’ll need:
- Cream cheese: An 8-ounce package, softened to room temperature, adds that creamy texture that balances out the flavors.
- Lean ground beef: One pound is ideal for a hearty base. You can opt for turkey for a lighter version.
- Taco seasoning mix: A 1-ounce packet infuses incredible flavor without the hassle of mixing spices from scratch.
- Salsa: In this recipe, 1 ½ cups bring both zest and moisture to the dip.
- Shredded Cheddar cheese: A generous amount (1 ½ cups) melts beautifully and gives that gooey goodness we all crave.
Optional ingredients to elevate your dip
Want to take your baked taco dip to the next level? Consider adding these optional ingredients:
- Jalapeños: For an extra kick, slice some fresh jalapeños to sprinkle on top.
- Black olives: Chopped olives lend a nice, briny contrast.
- Sour cream or guacamole: Dollops of either on top add a refreshing coolness.
- Green onions: Chopped for garnish, they provide a light crunch and vibrant color.
These additions can make your dip even more irresistible! For tips on serving suggestions, check out this article on pairing dips with sides.
Preparing Baked Taco Dip
Making a baked taco dip is a fantastic way to impress friends at your next gathering. Not only is it delicious, but it's also super easy to whip up. Let's dive into the process, step by step, to ensure your dip turns out perfectly every time!
Gather Your Ingredients and Tools
Before you get started with the actual cooking, it’s essential to gather all of your ingredients and tools. This will make the process smoother and more enjoyable. Here’s what you'll need:
-
Ingredients:
-
1 (8 ounce) package cream cheese, at room temperature
-
1 pound lean ground beef
-
1 cup water
-
1 (1 ounce) package taco seasoning mix
-
1 ½ cups salsa
-
1 ½ cups shredded Cheddar cheese
-
Tools:
-
An 8x8-inch baking dish
-
Large skillet
-
Mixing spoon or spatula
-
Measuring cups
Having these items ready will not only save you time but will allow you to have fun while cooking!
Prepare the Cream Cheese Layer
The first layer of your baked taco dip sets the stage for wonderful flavors. Take the cream cheese and let it reach room temperature—this makes it easier to spread. Using a spatula, spread it evenly across the bottom of your baking dish. This creamy layer will serve as the perfect base, adding a richness that balances the spices.
Cook and Season the Ground Beef
Next, focus on the star of your dish: the seasoned ground beef. Heat a large skillet over medium-high heat and add the ground beef. Cook it for about 5 to 10 minutes until it’s crumbly, browned, and fully cooked. You’ll want to break it up with your spatula to ensure even cooking. Once the beef is cooked, add water and taco seasoning. Stir until well combined and let it simmer for about 3 to 5 minutes, allowing the flavors to meld. This step is crucial for an authentic taco taste—think of it as creating a mini taco filling!
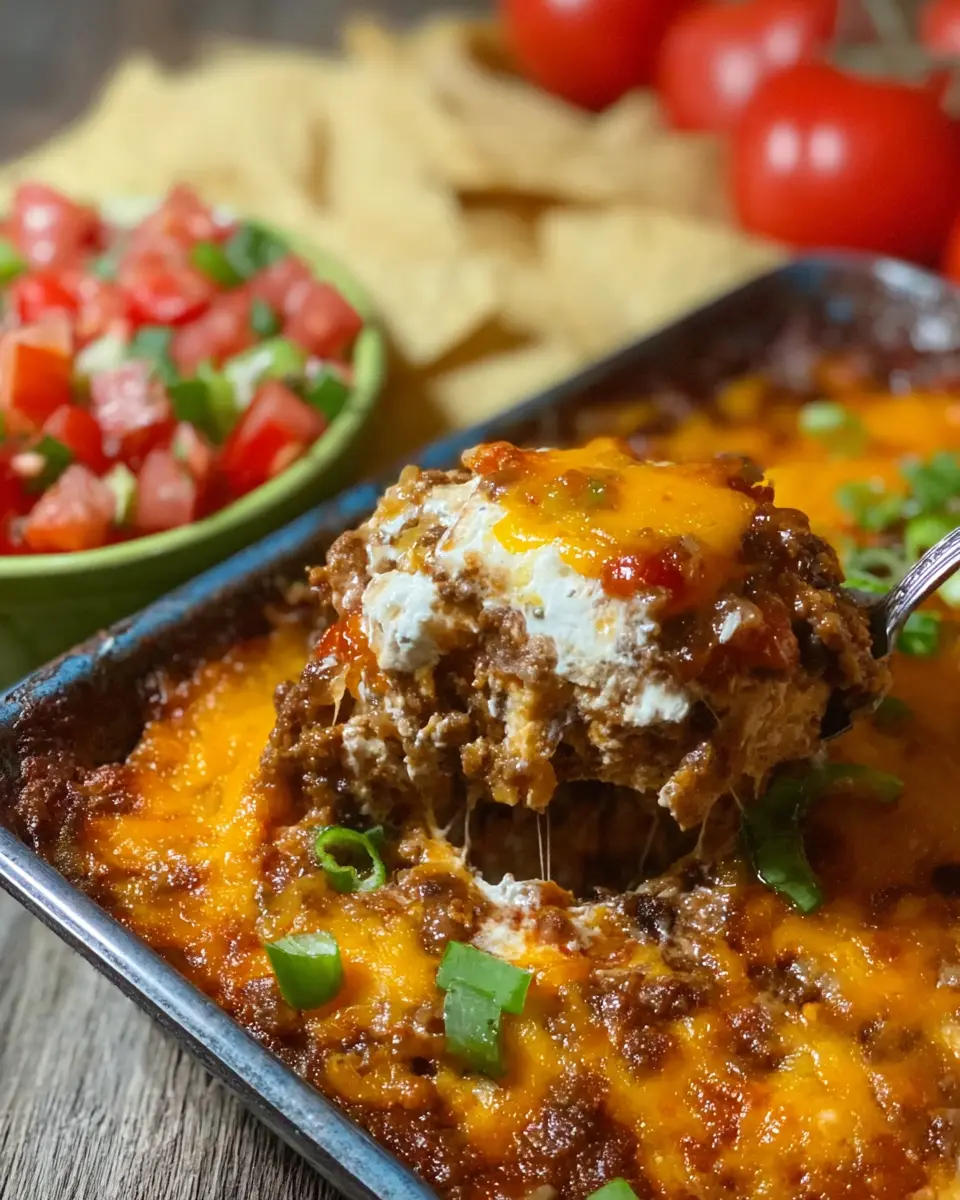
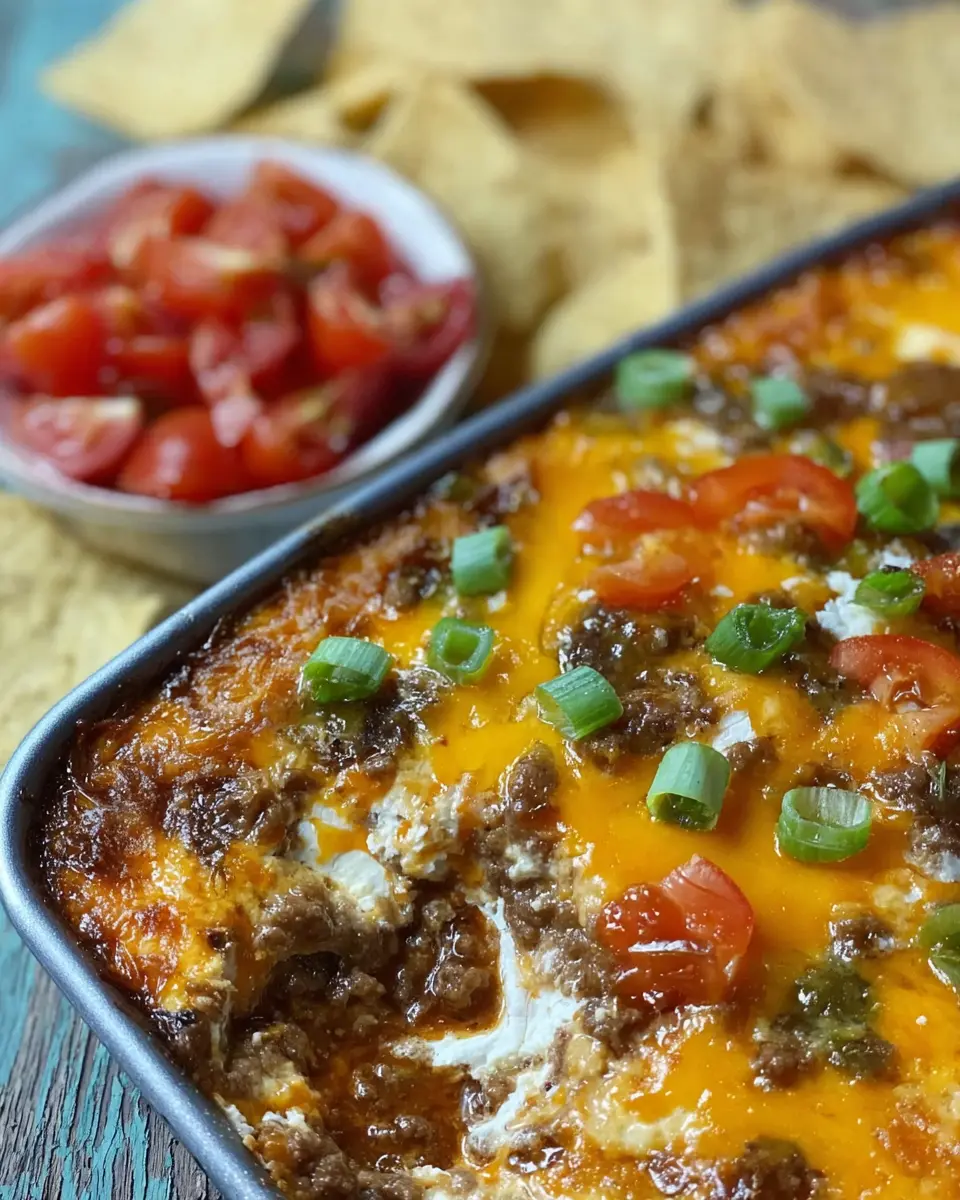
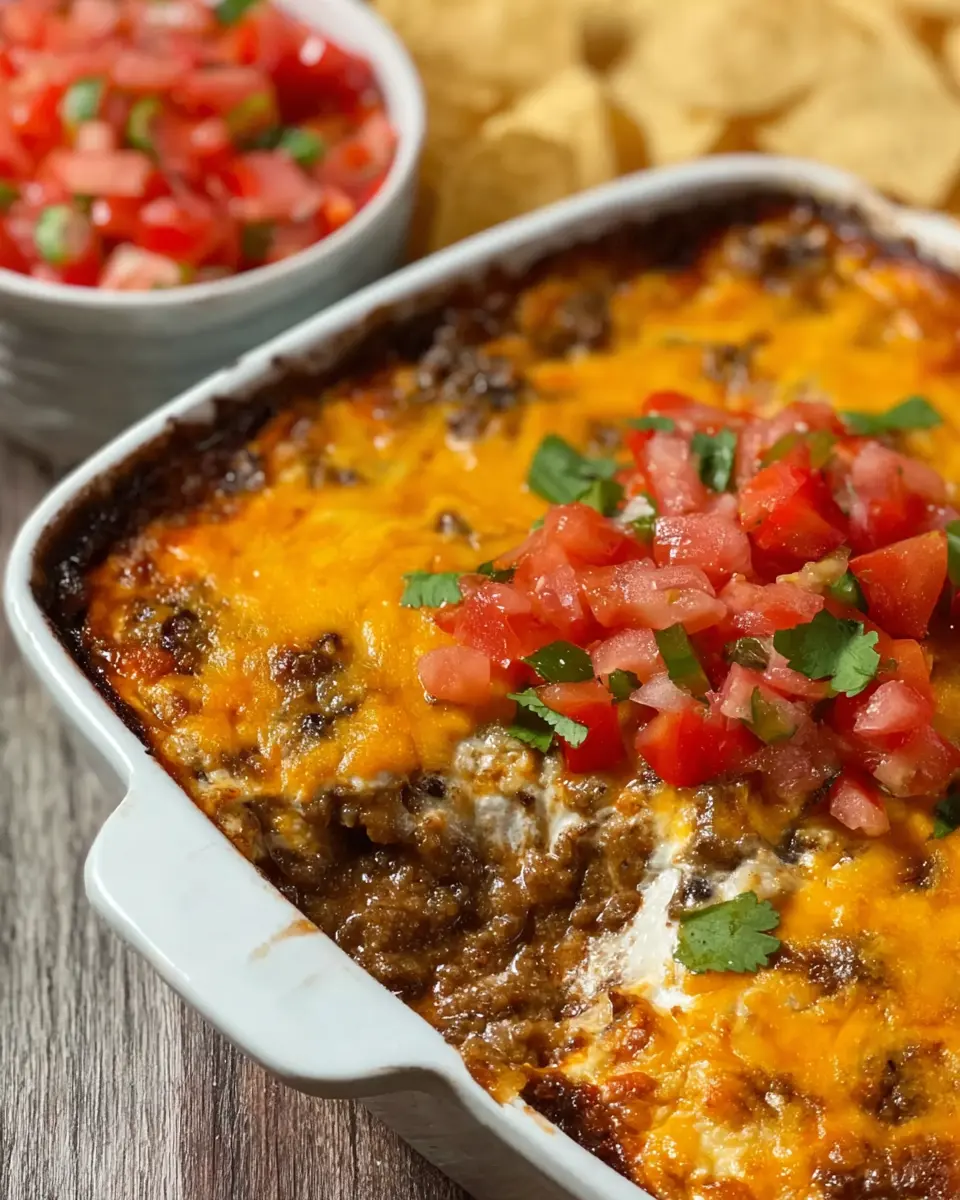
Layer Your Ingredients in the Baking Dish
Now it's time for the fun part—layering! Start by spreading the cooked beef mixture over the cream cheese layer in your baking dish. Follow that with a generous pour of salsa, and top it all off with a lovely sprinkle of shredded Cheddar cheese. Each layer contributes to a harmonious blend that your taste buds will thank you for!
Bake and Let the Flavors Meld
Preheat your oven to 375°F (190°C). Once your layered dip is ready, place it in the oven. Bake for about 20 minutes or until it's bubbling and the cheese has melted to perfection. This is the moment when all the flavors come together beautifully, creating that irresistible aroma that fills your kitchen.
Once it’s out, let it cool for just a minute before serving. Pair it with crisp tortilla chips and watch it disappear. Enjoy your tasty baked taco dip—it’s bound to be a hit!
For more delicious dip recipes, check out Epicurious for inspiration.
Variations on Baked Taco Dip
Vegetarian Baked Taco Dip
For a delicious vegetarian twist on this classic baked taco dip, swap out the ground beef for a mix of black beans, corn, and diced bell peppers. Simply sauté your veggies and mix them in with the cream cheese base. You can even add some chopped avocado on top before serving for an added layer of flavor. According to the American Heart Association, incorporating more plant-based options can boost your heart health!
Spicy Baked Taco Dip
If you're looking to kick it up a notch, try adding diced jalapeños or a splash of hot sauce to your ground beef mixture. You can also use pepper jack cheese instead of Cheddar for an extra spicy kick. Not only will this version excite your taste buds, but research from the National Institutes of Health shows that spicy foods can even boost your metabolism!
Cooking tips and notes for Baked Taco Dip
How to achieve the perfect creaminess
To ensure your baked taco dip is irresistibly creamy, let the cream cheese soften at room temperature before spreading it in the baking dish. This step allows for easier mixing and a smoother consistency. Consider blending it with a bit of sour cream or Greek yogurt for an extra layer of richness. If you're feeling adventurous, a touch of cream can elevate the creaminess even further!
Tips for balancing flavors
For a well-balanced baked taco dip, choose a salsa that complements your ingredients without overpowering them. A medium salsa often strikes the right balance. Don't shy away from adding fresh herbs, like cilantro, or a squeeze of lime juice for brightness. Taste as you go; it’s an essential step that ensures each bite is packed with flavor. Check out this guide on seasoning for more tips!
Serving suggestions for Baked Taco Dip
Best dippers for your taco dip
When it comes to enjoying your baked taco dip, the right dippers can make all the difference. Tortilla chips are a classic choice, but you can also elevate your game with:
- Pita chips: Their sturdy structure holds up well against the gooey dip.
- Veggie sticks: Carrots, celery, and bell peppers add a fresh crunch and a healthy touch.
- Crackers: Opt for whole grain or cheese-flavored for an extra layer of taste.
- Mini tostadas: Perfect for those who want a little more crunch.
Creative platter ideas
Why stop at simply serving your dip when you can create an enticing platter? Arrange your choice of dippers around the baked taco dip, and consider adding:
- Fresh toppings: Chopped cilantro, diced avocados, or sliced jalapeños for a spicy kick.
- Side condiments: Sour cream or guacamole can provide a creamy contrast.
- Colorful garnishes: A sprinkle of lime juice or a few lime wedges will not only brighten up your dish but enhance the flavors.
By presenting your dip in a visually appealing way, you’ll impress your guests and keep them coming back for more! For more ideas on serving dips, check out resources like Bon Appétit.
Time Breakdown for Baked Taco Dip
Getting dinner on the table in no time is a breeze with this delicious Baked Taco Dip! Here's a quick rundown of the time you'll need to whip it up for your family or friends.
Preparation Time
- 10 minutes: Gather your ingredients, spread the cream cheese, and get your beef cooking. Easy peasy!
Cooking Time
- 30 minutes: Let your dip bake to bubbly perfection while you catch up on your favorite show.
Total Time
- 40 minutes: In just over half an hour, you'll have a crowd-pleaser ready to enjoy.
Now that you see how quick it is to make this Baked Taco Dip, why not give it a try? Serve it with tortilla chips for an irresistible treat! If you're curious about variations, check out Bon Appétit’s article on elevating your salsa game for even more flavor.
Nutritional Facts for Baked Taco Dip
Enjoying a serving of this delightful baked taco dip? Let’s break down its nutritional value!
Calories
Each serving contains approximately 317 calories, making it a satisfying choice for a snack or appetizer without going overboard.
Protein
Packed with 19 grams of protein, this dip provides a hearty boost, thanks to the lean ground beef and cheese.
Sodium
Keep in mind, it has about 800 mg of sodium per serving. If you're watching your salt intake, consider pairing it with fresh veggies instead of tortilla chips for a lighter option.
For more nutritional insights and tips on enjoying hearty dips without guilt, check out sources like Healthline and USDA FoodData Central.
FAQs about Baked Taco Dip
Can I make this dip ahead of time?
Absolutely! You can prepare your baked taco dip in advance. Simply follow the recipe, assemble the layers, and cover the dish with plastic wrap or foil. Store it in the refrigerator for up to 24 hours before baking. When you're ready, just pop it into the oven straight from the fridge. It may require a few extra minutes to bake, so keep an eye on it!
How do I store leftover taco dip?
Leftover baked taco dip can be stored in an airtight container in the refrigerator for up to three days. You can easily reheat it in the microwave or oven. If you're using the oven, cover it with foil to prevent it from drying out. You might want to serve it with some fresh tortilla chips or veggies for an extra crunch!
Can I use ground turkey instead of beef?
Definitely! Ground turkey is a fantastic alternative for your baked taco dip. It’s leaner and gives the dish a slightly different flavor profile while still being delicious. Just cook it the same way you would the ground beef, and your dip will be just as tasty. For the best results, choose a ground turkey blend with a bit of fat for added flavor.
Conclusion on Baked Taco Dip
Why you should try this dip tonight!
If you're craving a crowd-pleasing appetizer or a comforting snack, give this baked taco dip a whirl tonight! With its creamy layers and zesty flavors, it’s perfect for game nights or casual get-togethers. Plus, it’s easy to make—satisfy your taste buds and delight your guests in just 40 minutes!
For more recipe ideas, check out Food Network or explore delectable toppings and variations on Allrecipes. Enjoy your cooking!

Baked Taco Dip
Equipment
- Oven
- skillet
- Baking Dish
Ingredients
- 1 package cream cheese at room temperature
- 1 pound lean ground beef
- 1 cup water
- 1 package taco seasoning mix
- 1.5 cups salsa
- 1.5 cups shredded Cheddar cheese
Instructions
- Preheat the oven to 375 degrees F (190 degrees C).
- Spread cream cheese in an even layer in the bottom of an 8x8-inch baking dish.
- Cook and stir ground beef in a large skillet over medium-high heat until crumbly, browned, and cooked through, 5 to 10 minutes. Add water and taco seasoning mix; stir. Simmer until most of the liquid evaporates, 3 to 5 minutes.
- Spread meat mixture over cream cheese in the baking dish. Pour salsa over the top and sprinkle with Cheddar cheese.
- Bake in the preheated oven until bubbling and cheese is melted, about 20 minutes.


Leave a Reply