
Introduction to Loaded Tater Tot Cups
What makes loaded tater tot cups a must-try?
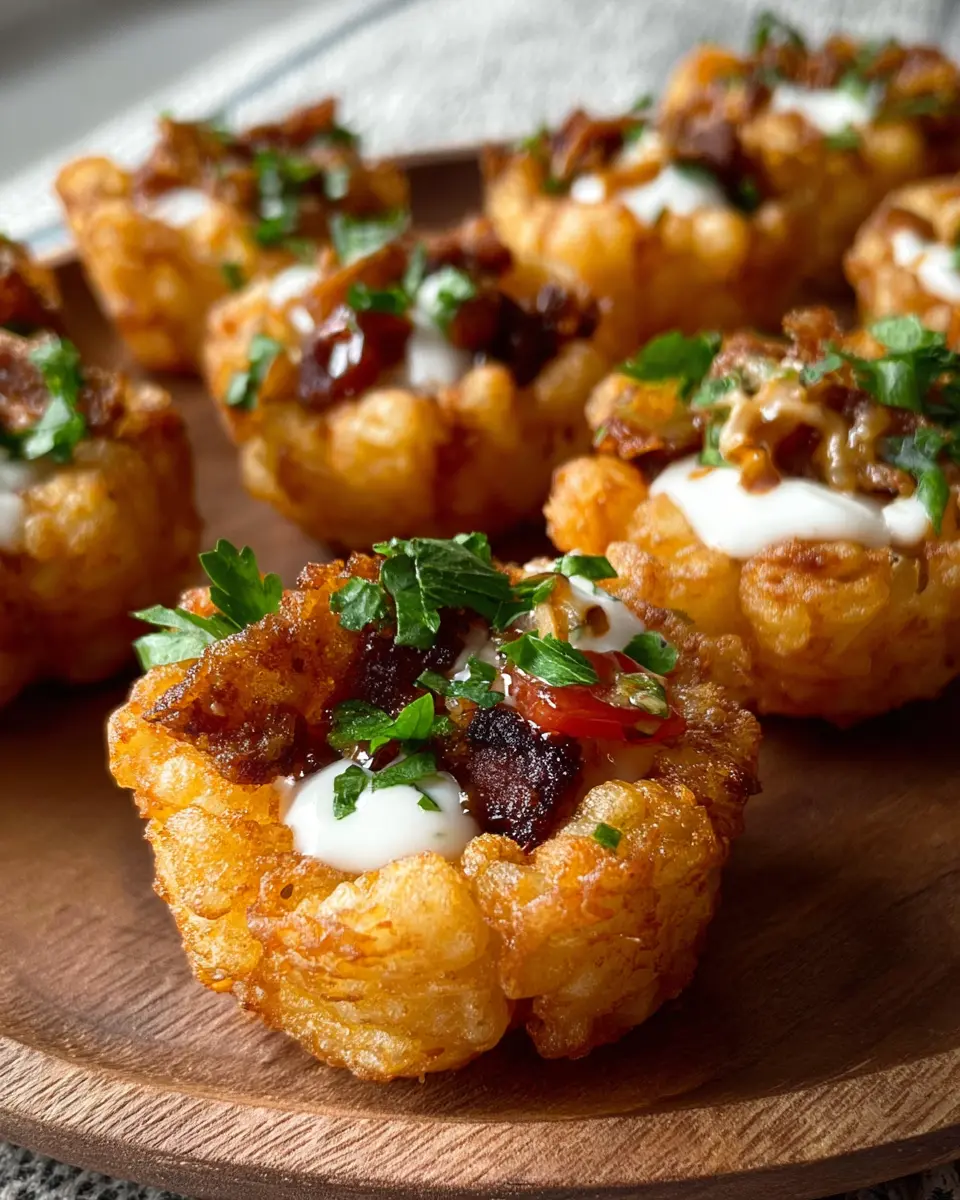
If you’re on the hunt for a dish that effortlessly combines crispy, cheesy goodness with savory Turkey Bacon, look no further than loaded tater tot cups! These delightful bites are not only incredibly satisfying but also a great conversation starter at any gathering. Imagine crispy tater tots molded into perfect little cups, brimming with melted cheese and hearty toppings. They’re the ultimate comfort food that’s easy to make, and I’ll bet my last dollar they’ll be the first thing to disappear at your next party.
One of the reasons loaded tater tot cups have taken the internet by storm is their versatility. Whether you're hosting a game day party or an intimate gathering, they're a crowd-pleaser for sure. Have you ever considered experimenting with different toppings? The classic combo of Turkey Bacon and cheese is just the beginning. You can customize them with diced chicken ham or even fresh veggies for a lighter alternative.
Plus, they’re easy to pop in your mouth without the fuss of silverware. Perfect for when you need to mingle or just want an impressive snack without all the work. Trust me; once you try these cups, you’ll understand why they’ve become such a sensation in the world of appetizers!
Ready to dive into the deliciousness? Let’s make some loaded tater tot cups!

Ingredients for Loaded Tater Tot Cups
Essential ingredients for loaded tater tot cups
Creating your loaded tater tot cups is simple and requires just a few essential ingredients. Gather these items for the ultimate flavor fusion:
- 48 frozen tater tots: These delightful, crispy bites form the base of your cups.
- 1 ¼ cups shredded cheddar cheese: A generous amount of cheese makes everything better!
- ¾ cup cooked, crumbled turkey bacon: For that savory crunch—you’ll want about six strips, cooked until crispy!
- Sour cream or ranch dressing: Use these as toppings to add creaminess.
- Fresh herbs like parsley or chives: A garnish that brings a pop of color and freshness.
Optional toppings and variations
Feel free to get creative with your loaded tater tot cups! Here are some ideas to elevate your dish:
- Chicken ham: For a different protein option.
- Diced jalapeños: If you enjoy a little heat.
- Avocado or guacamole: Adds creaminess and a touch of richness.
- BBQ sauce or hot sauce: Drizzle for an extra flavor kick.
Mix and match to suit your taste and impress your guests! For more tips on customizing dishes, check out this culinary guide.
Preparing Loaded Tater Tot Cups
If you’re ready to impress your friends at your next gathering, these loaded tater tot cups are an absolute must-try! They’re not only easy to make but also incredibly mouthwatering. Let’s break down the steps you’ll need to take to prepare these little bites of heaven.
Gather Your Equipment
Before diving into the cooking fun, let’s get organized! Here’s a quick checklist of what you’ll need:
- Baking Sheet Pan: Essential for keeping things tidy while baking.
- Cheese Grater: If you’re grating fresh cheese, you’ll want this handy.
- 12-Cup Muffin Tin: The star of the show for forming your tater tot cups.
- Shot Glass: This will serve as our handy tool for shaping the cups.
Make sure you have everything on hand before you start—nothing puts a damper on cooking like frantically searching for your muffin tin!
Preheat the Oven
Setting the scene with the right ambiance starts with preheating your oven. Turn it on to 425 degrees F—this temperature will make sure your loaded tater tot cups get that perfect crispy exterior. In the meantime, grease your muffin tin with cooking spray, olive oil, or melted butter to ensure your tater tots won’t stick.
Arrange the Tater Tots
Grab your frozen tater tots and toss four into each muffin cavity. They’re so versatile! Did you know that tater tots can hold a variety of flavors? After arranging, pop them in the oven and set a timer for 10 minutes. While you wait, why not look up some creative toppings or flavor combos?
Create the Cup Shape
Once your tater tots have crisped up a bit, it’s time for the fun part! Take your shot glass and press it down into the center of the tater tots to mold them into cup shapes. This is where the magic happens! The more you press, the better they hold their form.
Add Toppings and Bake
Now comes the best part—let your creativity shine! Sprinkle a generous amount of shredded cheese and crumbled turkey bacon into each cup. You can also consider alternatives like chicken ham, depending on your preference. Bake these heavenly creations for another 15-20 minutes, or until you're greeted with a glorious melty finish. Once they come out, top with a dollop of sour cream or ranch dressing and garnish with parsley or chives for that extra flair!
These loaded tater tot cups will not only satisfy your cravings but also wow your guests with their presentation and flavor. So, what are you waiting for? Get your equipment ready and enjoy the cooking journey!

Variations on Loaded Tater Tot Cups
Loaded Tater Tot Cups with Chicken Ham
If you're looking to mix things up, consider adding chicken ham to your loaded tater tot cups. Simply swap out the turkey bacon for diced cooked chicken ham for a savory twist. Layer it generously over the melted cheese and crispy tater tots for a new, delightful flavor profile that will leave your guests raving about your creativity. Plus, it’s a great way to use up leftovers!
Vegetarian-Friendly Loaded Tater Tot Cups
For a vegetarian version, leave out the turkey bacon and get creative with toppings! Think sautéed vegetables like bell peppers, onions, and mushrooms, paired with your favorite cheese. You can also add black beans or corn for extra texture and flavor. These loaded tater tot cups can satisfy a hearty craving while being completely meat-free, making them a versatile addition to any gathering!
If you’re interested in more variations, consider checking out some fantastic tater tot recipes on sites like Allrecipes or Taste of Home.
Cooking tips and notes for Loaded Tater Tot Cups
Tips for achieving crispy tater tots
To get those crispy tater tots that everyone loves, make sure to space them out evenly in your muffin tin. This allows hot air to circulate, ensuring each cup gets that delightful crunch. For extra crispiness, consider giving your tater tots a quick spray of cooking oil before baking—they'll thank you for it later!
Adjusting cooking times based on your oven
Every oven is unique, so you may need to tweak the cooking times for your loaded tater tot cups. If you have a convection oven, you might find that your cups cook faster—keep an eye on them after the first bake. For traditional ovens, it’s best to stick to the suggested times, but don't hesitate to check for that golden-brown perfection as they approach the end of cooking!
Serving suggestions for Loaded Tater Tot Cups
Perfect pairings with sides and dips
When it comes to enjoying your loaded tater tot cups, the right sides and dips can elevate your snack game! Serve them with a refreshing side salad or crispy veggie sticks for a crunchy contrast. For dips, consider classic favorites like guacamole or a zesty salsa. If you're in the mood for something creamier, a silky ranch dressing or a tangy chipotle mayo will complement the flavors beautifully. You might be surprised to know that 87% of people enjoy dipping their snacks, further proving that the right accompaniments are key to a satisfying experience!
Creative serving ideas for gatherings
These loaded tater tot cups are not just delicious; they also make for a great ice breaker at any gathering. Presentation matters, so think about serving them in mini cups or on a colorful platter. You could even create a fun topping station with various options like jalapeños, shredded cheese, or pickled onions. This interactive approach not only allows guests to customize their cups but also adds a lively element to your party. Plus, who doesn't love a DIY snack? It gives everyone a chance to mix, match, and mingle!
Time Breakdown for Loaded Tater Tot Cups
Preparation Time
Gathering your ingredients and getting everything ready will take about 30 minutes. This includes greasing your muffin tin, assembling the tater tots, and prepping the toppings.
Cooking Time
Once your tater tot cups are in the oven, you'll need to allocate approximately 25-30 minutes. This includes the initial bake for the tater tots and the second bake for melting the cheese and crisping everything up.
Total Time
In total, you’re looking at around 60 minutes from start to finish to create these delicious loaded tater tot cups. Perfect for a quick snack or as an appetizer for your next gathering!
For more helpful tips on making the most out of your kitchen time, check out resources from Cooking Light or Bon Appétit.
Nutritional Facts for Loaded Tater Tot Cups
When it comes to enjoying loaded tater tot cups, knowing what you’re eating can make all the difference. Here's a quick breakdown of the nutritional content per serving:
Calories
Each serving contains approximately 250 calories, making them a satisfying option for your next gathering without overindulging.
Protein
Packed with about 10 grams of protein per serving, these cups offer a great source of energy, especially when you pair them with turkey bacon and cheese.
Sodium
Be mindful of the sodium content, which sits around 600 mg per serving. Balancing this with fresh veggies or a side salad can help you keep your meal in check.
Understanding the nutritional details can help you enjoy these delicious bites while maintaining a mindful approach to your snacks. For a deeper dive into crafting balanced meals, consider resources like the American Heart Association or MyPlate. Enjoy your cooking!
FAQs about Loaded Tater Tot Cups
Can I make loaded tater tot cups in advance?
Absolutely! You can prepare the loaded tater tot cups and assemble them in advance. Just bake them until they are shaped, then let them cool completely. Cover with plastic wrap and store them in the refrigerator for up to 24 hours before the final bake. When you’re ready to serve, simply pop them back in the oven to reheat and melt the cheese.
What are some great topping ideas?
The beauty of loaded tater tot cups lies in their versatility! Aside from turkey bacon and cheese, consider these tasty toppings:
- Chopped green onions
- Diced tomatoes
- Sliced jalapeños for a kick
- Avocado or guacamole
- A drizzle of spicy ranch or BBQ sauce
Feel free to get creative and customize your cups to match your taste!
How can I store leftovers effectively?
If you have any leftover loaded tater tot cups, store them in an airtight container in the fridge for up to 3 days. To enjoy them again, reheat in the oven for that crispy texture, rather than using the microwave. Just 10-15 minutes at 350°F should do the trick, keeping them delicious and satisfying! For more tips on food storage, check out Food Safety guidelines.
Conclusion on Loaded Tater Tot Cups
In summary, these loaded tater tot cups are your go-to snack for any occasion. Quick to prepare and delightful to eat, they feature a perfect blend of crispy tater tots, melty cheese, and savory turkey bacon. Whether as a party appetizer or a personal treat, they’re sure to impress! For more delicious ideas, check out Saucy Recipes for some inspiration.

Loaded Tater Tot Cups
Equipment
- baking sheet pan
- Cheese Grater
- 12-cup muffin tin
- shot glass
Ingredients
Tater Tot Cups
- 48 pieces frozen tater tots 4 per muffin tin cavity
- 1.25 cups shredded cheddar cheese
- 0.75 cups cooked, crumbled bacon about 6 strips
- sour cream for topping
- ranch dressing for topping
- parsley for garnish
- chives for garnish
Instructions
Cooking Instructions
- Preheat your oven to 425 degrees F, then grease a muffin tin with cooking spray, olive oil, or melted butter.
- Add 4 frozen tater tots into each muffin tin cavity, then bake for 10 minutes.
- Once baked, use a shot glass to press the tater tots into cup shapes. Sprinkle on shredded cheese and crumbled bacon, then bake for another 15-20 minutes.
- Top with your choice of sour cream or ranch dressing, then garnish with parsley or chives before serving!
Bacon Preparation
- If using fresh bacon, I recommend using the oven method of baking at 425 degrees for 25 minutes and about 15 minutes if using thin bacon. Then transfer the crispy bacon to paper towels to drain off excess grease and chop it up to make bacon crumbles.


Leave a Reply