
Introduction to Artisan No-Knead Pizza Crust
Why No-Knead Pizza Crust?
Picture this: crisp, bubbly crust with that artisanal touch—without the workout for your arms! The artisan no-knead pizza crust embraces simplicity, allowing even novice bakers to achieve extraordinary results with minimal effort. When you let the dough rise overnight, the flavors develop beautifully, creating a crust that's both chewy and delicate. And the best part? No need for flour-dusted countertops or rigorous kneading techniques! Instead, you can focus on crafting your perfect toppings and enjoying the process.
The Art of Homemade Pizza
Homemade pizza isn’t just a meal; it’s an experience! Making your own pizza gives you the power to create mouth-watering combinations tailored to your taste buds. Whether you crave a classic Margherita or a veggie-packed delight, the artisan no-knead pizza crust provides a fantastic foundation. Plus, you can enjoy the pleasure of sharing with friends or hosting a cozy pizza night. Not to mention, mastering this recipe might just turn you into the go-to pizza chef among your social circle. Are you ready to elevate your homemade pizza game? Let’s dive in!
Ingredients for Artisan No-Knead Pizza Crust
Creating the perfect artisan no-knead pizza crust starts with a handful of quality ingredients. Here’s what you’ll need:
Essential ingredients for the crust
- 2 cups plus 1 tablespoon (247g) of King Arthur Unbleached Bread Flour: This high-protein flour ensures a chewy and robust crust.
- ⅛ teaspoon of active dry yeast or instant yeast: Essential for the dough’s rise.
- ½ teaspoon granulated sugar: This small amount helps feed the yeast and boosts fermentation.
- 1 ¼ teaspoons (8g) table salt: Enhances flavor and strengthens the dough.
- ¾ cup plus 1 tablespoon (185g) lukewarm water: The right temperature encourages yeast activity.
Optional toppings and variations
Feel free to get creative with your toppings! For a Veg Vinaigrette Pizza, consider drizzling vinaigrette over roasted veggies, while a Smoky-Sweet Pizza pairs perfectly with BBQ sauce, sliced pears, and Turkey Bacon. Mix and match based on your taste preferences to create a pizza that suits you. For more topping ideas, check out this guide on pizza toppings!
Happy pizza-making!
Step-by-step Preparation of Artisan No-Knead Pizza Crust
Creating a delicious artisan no-knead pizza crust at home can be simpler than you think. Follow these steps to bring that cozy pizzeria vibe right into your kitchen!
Measure and Mix the Ingredients
Begin by carefully measuring your ingredients. You will need:
- 2 cups plus 1 tablespoon (247g) King Arthur Unbleached Bread Flour
- ⅛ teaspoon active dry yeast or instant yeast
- ½ teaspoon granulated sugar
- 1 ¼ teaspoons (8g) table salt
- ¾ cup plus 1 tablespoon (185g) lukewarm water
In a large mixing bowl, combine all the ingredients, stirring them together until they form a rough, sticky dough. Cover the bowl with plastic wrap or a clean kitchen towel and let it rise at room temperature for 24 hours. It’s amazing how this simple mix transforms into something wonderful—just wait until you see it!
Allow the Dough to Rise
After letting your dough rise for a full day, you're in for a treat. This long and slow fermentation not only improves flavor but also enhances the texture of your artisan no-knead pizza crust. If you want to develop even more flavor, feel free to refrigerate the dough for up to six days.
Preheat the Oven
While your dough is rising or once it’s ready to bake, preheat your oven to 500°F to 550°F. If you have a baking steel or pizza stone, place it inside now, allowing at least 30 minutes for it to heat up perfectly. A hot oven is crucial for achieving that pizzeria-like crust!
Shape the Dough
When you’re ready to shape your dough, divide it into two equal pieces. On a well-floured surface, transfer one piece and ready it for stretching.
Proof the Dough
Cover your shaped dough with a kitchen towel or plastic wrap and let it proof for about 45 minutes to an hour. This is the perfect time to set the table or prepare your toppings!
Stretch and Form the Crust
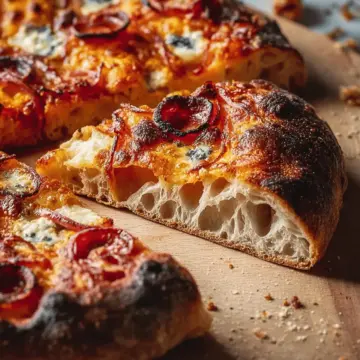
Now the fun begins! On a floured surface, gently press down the dough with your fingertips, ensuring you keep the edges thick for that airy crust. Using your knuckles, coax the dough into a circle about 10–12 inches in diameter.
Add Toppings and Bake
Once you have your crust shaped, slide it onto a floured pizza peel or a trimmed piece of parchment paper. Start with a light sauce and then layer your favorite toppings. When you’re ready to bake, slide the pizza onto your hot stone or steel, and bake for approximately 6 to 8 minutes until it’s beautifully bubbly and slightly charred on the edges.
Each step in preparing this artisan no-knead pizza crust is designed to build flavor and texture, ensuring you enjoy a slice that tastes just like it came from a bustling pizzeria. Enjoy your homemade masterpiece!
Variations on Artisan No-Knead Pizza Crust
Veg Vinaigrette Pizza
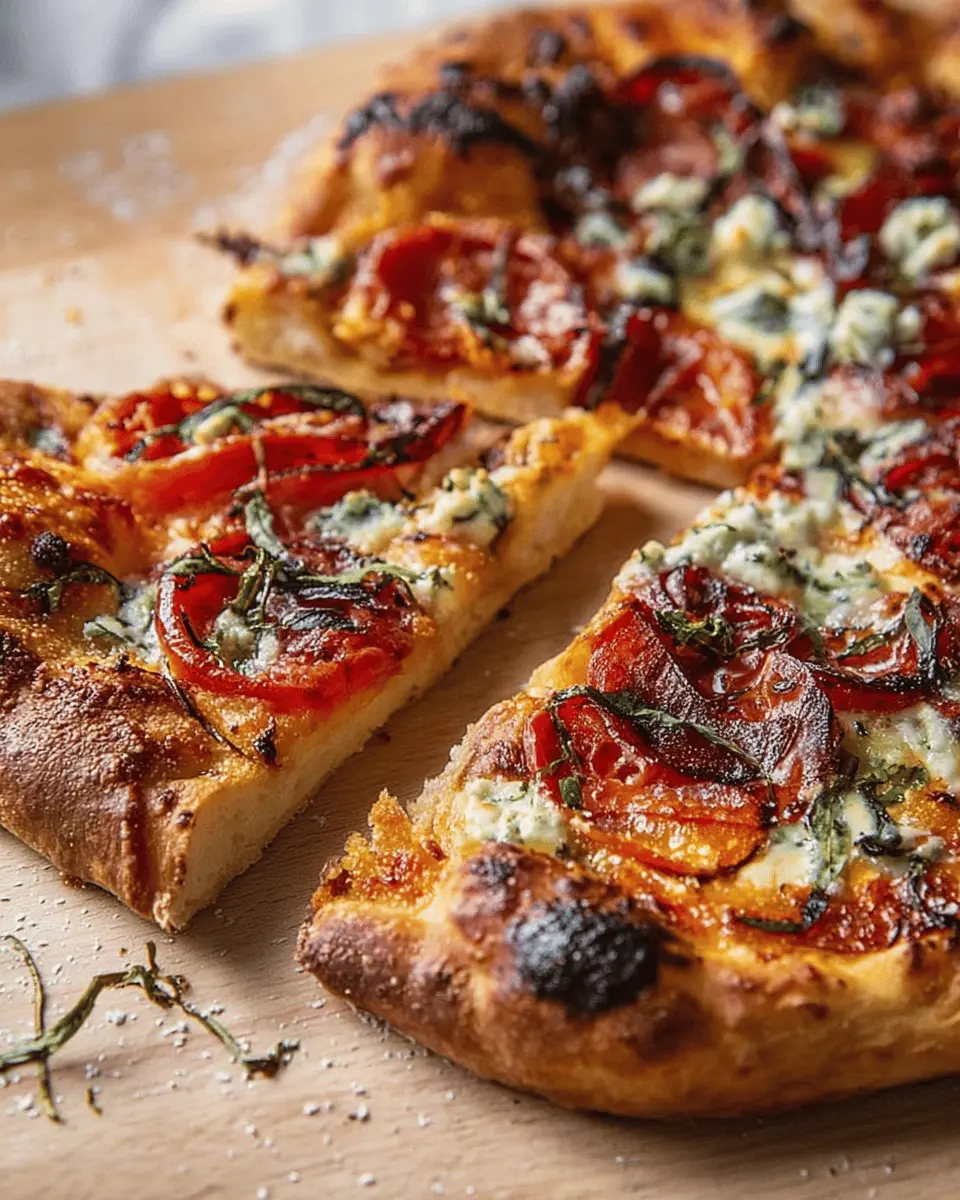
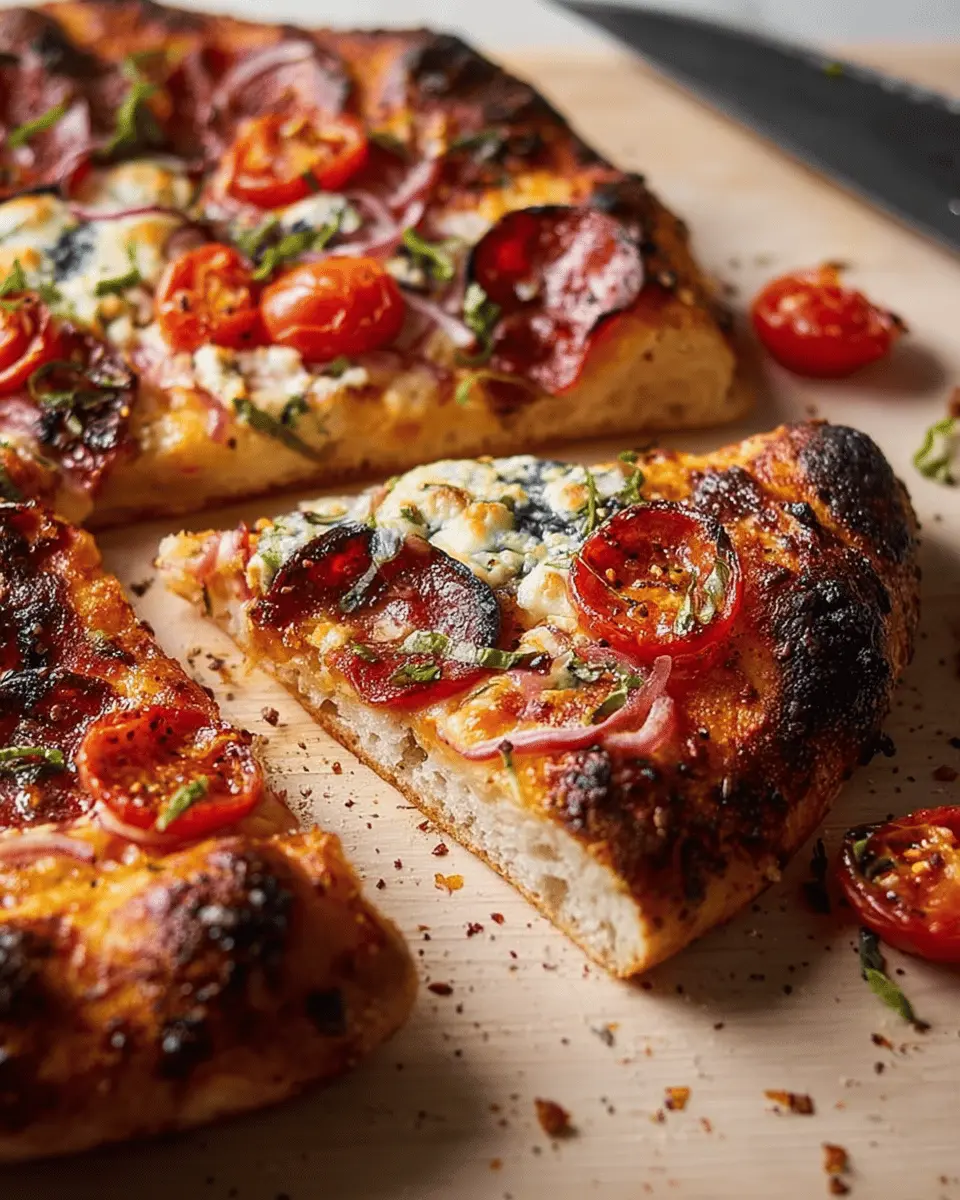
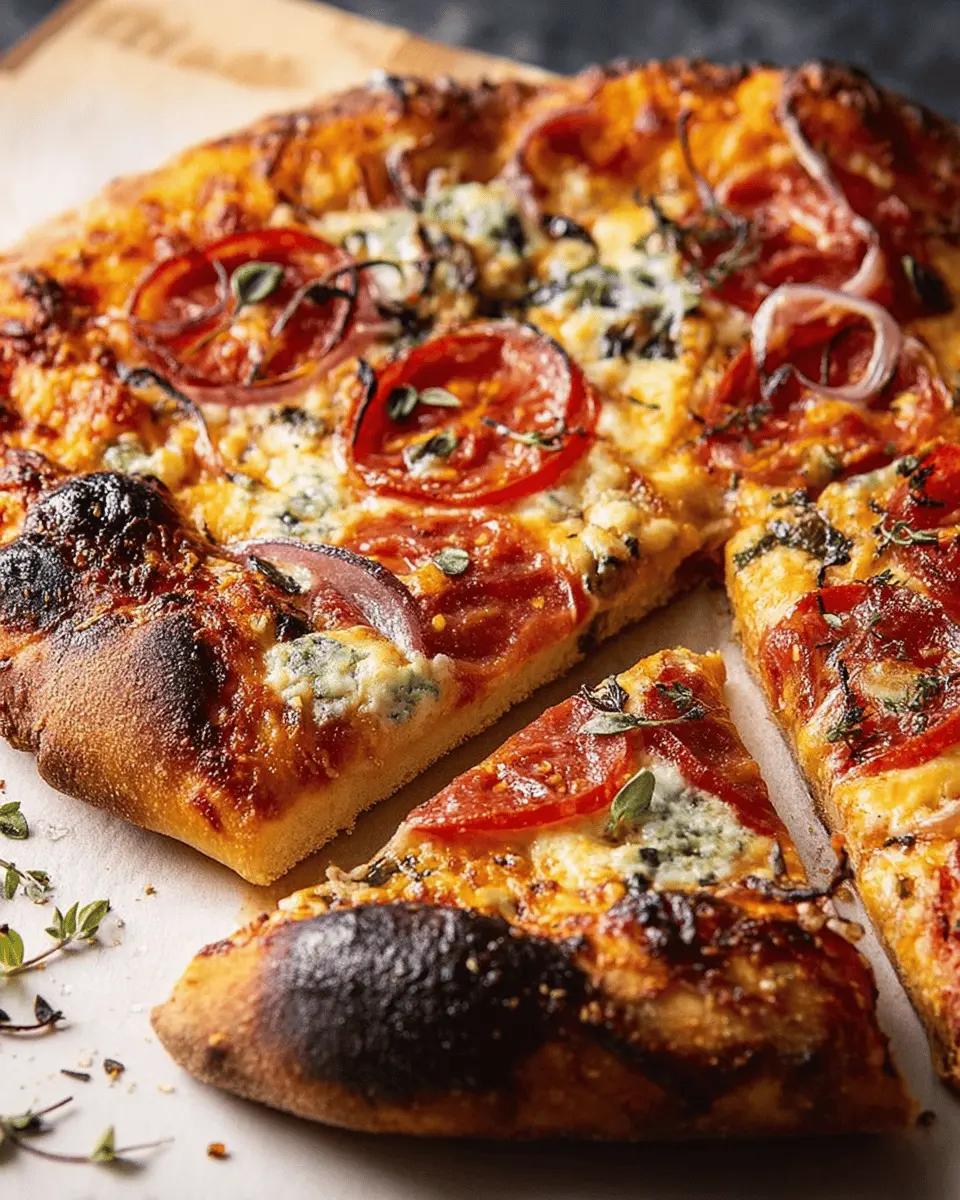
Transform your artisan no-knead pizza crust into a vibrant Veg Vinaigrette delight! Start by spreading your favorite red sauce and adding a sprinkle of mozzarella cheese. Next, pile on roasted butternut squash or sweet potatoes for that warm, comforting flavor. After baking, drizzle a zesty vinaigrette—this creates a mouthwatering aroma that elevates your pizza! Finish it off with quick-pickled red onions or radishes and a sprinkle of feta or crumbled blue cheese for a colorful presentation.
Smoky-Sweet Pizza
For a unique twist, try the smoky-sweet pizza. Start with a thin layer of BBQ sauce instead of traditional pizza sauce, and top with mozzarella. Add slices of pear and precooked turkey bacon for a delightful combination. Thinly sliced scallions, briefly fried in oil, bring a perfect crunch. After baking, finish with a drizzle of your favorite BBQ sauce mix for that sweet and tangy kick. This unexpected blend of flavors will have everyone asking for seconds!
For more topping ideas, check out our recipe suggestions and get creative in the kitchen!
Cooking Tips and Notes for Artisan No-Knead Pizza Crust
Creating the perfect artisan no-knead pizza crust is all about preparation and technique. Here are a few tips to elevate your pizza game:
-
Preheat Properly: Ensure your oven is preheated to at least 500°F for 30 minutes. This guarantees a crisp crust that rivals your favorite pizzeria.
-
Flour Ratio Matters: For a chewier texture, stick with high-protein bread flour. If you prefer a softer crust, you can substitute with all-purpose flour without any changes to the recipe.
-
Flavor Development: Let your dough rest in the fridge for up to six days. This not only enhances flavor but gives you flexibility for last-minute pizza nights.
By following these tips, you're well on your way to enjoying delicious, artisan-style pizza right at home! Explore more about bread flour at King Arthur Baking for the best results.
Serving Suggestions for Artisan No-Knead Pizza
When it comes to dressing up your artisan no-knead pizza crust, the possibilities are as endless as your cravings! Here are a few engaging topping ideas to elevate your pizza game:
-
Veggie Delight: Start with a classic red sauce, then load up with freshly grated mozzarella, roasted butternut squash, and a drizzle of homemade vinaigrette for a burst of flavor. Add quick-pickled red onions or radishes for color and zing.
-
Smoky-Sweet Indulgence: Spread a layer of BBQ sauce mixed with tomato sauce as your base, followed by mozzarella, tender turkey bacon, and pears. Finish it off with a drizzle of BBQ sauce post-bake for an irresistible touch.
Feeling adventurous? Add toppings like chicken ham or other favorites like artichokes and arugula! For more tips on homemade sauces or specialty toppings, check out this guide on pizza toppings.
With these serving suggestions, your artisan no-knead pizza crust is sure to impress!
Time Breakdown for Artisan No-Knead Pizza Crust
Planning is key when making your artisan no-knead pizza crust! Here’s a quick time guide to help you manage your pizza-making adventure:
Preparation Time
Get your hands ready for some fun! You’ll need about 15 minutes to mix up the dough. Remember, good things take time, so stick around for that initial rise.
Baking Time
Once your oven is preheated to a sizzling 500°F, your pizza will bake in just 4 to 8 minutes. Keep an eye on it—those golden-brown edges are what we’re aiming for!
Total Time
From start to finish, allow for 1 day and 30 minutes. This includes that essential 24-hour wait for the dough to rise, which is what truly makes this crust sing with flavor.
By breaking down the timing like this, you can better manage your cooking schedule and ensure your perfect homemade pizza experience. For more tips on dough handling and baking, check out resources like Serious Eats or King Arthur Baking. Happy pizza making!
Nutritional Facts for Artisan No-Knead Pizza Crust
Calories
Each serving of artisan no-knead pizza crust packs approximately 230 calories, making it a satisfying base for your favorite toppings without feeling overly indulgent.
Protein
With around 7 grams of protein per serving, this crust provides a nice boost to your meal, contributing to muscle health and keeping you full longer.
Sodium
This crust contains about 350 milligrams of sodium per serving, which is relatively moderate. You can customize this by adjusting salt in the recipe or choosing low-sodium toppings to suit your dietary needs.
FAQ about Artisan No-Knead Pizza Crust
How can I store leftover dough?
Storing leftover dough is simple! You can keep it in the fridge for up to six days. Just make sure to cover it tightly with plastic wrap or place it in an airtight container to prevent it from drying out. When you're ready to use it, take it out, let it warm to room temperature, and you'll be all set to create delicious pizza once again!
Can I customize the toppings?
Absolutely! One of the best things about this artisan no-knead pizza crust recipe is its versatility. Feel free to get creative with toppings — whether you’re in the mood for classic pepperoni, a veggie medley, or even turkey bacon and chicken ham, the choice is yours. Don’t forget to check out some delicious topping ideas in our tips section!
What type of flour works best?
For the best results, we recommend using high-protein bread flour, like King Arthur Unbleached Bread Flour. This helps achieve a chewy yet delicate crust. If you prefer a slightly less chewy option, you can substitute with an equal amount of All-Purpose Flour.
Conclusion on Artisan No-Knead Pizza Crust
Crafting an artisan no-knead pizza crust is not only achievable but also incredibly rewarding. This easy method yields a deliciously airy and flavorful crust, perfect for any toppings you desire. So, roll up your sleeves, gather your ingredients, and enjoy a pizzeria-quality experience right in your own kitchen! Want to make it vegan? Substituting toppings like nutritional yeast and fresh vegetables allows you to explore even more delicious variations. Happy baking!
Artisan No-Knead Pizza Crust
Equipment
- baking steel
- baking stone
- pizza peel
- mixing bowl
Ingredients
Dough
- 2 cups plus 1 tablespoon King Arthur Unbleached Bread Flour or All-Purpose Flour for a less chewy crust
- ⅛ teaspoon active dry yeast or instant yeast
- ½ teaspoon granulated sugar
- 1 ¼ teaspoons table salt
- ¾ cup plus 1 tablespoon water, lukewarm
Toppings
- Veg Vinaigrette or Smokey-Sweet Pizza see tips for details
Instructions
Dough Preparation
- Weigh your flour; or measure it by gently spooning it into a cup, then sweeping off any excess. Stir all of the ingredients together. Cover the rough, sticky dough and let it rise at room temperature for 24 hours. After this first rise, you may choose to refrigerate the dough for up to six days, which will help develop its flavor.
- With a rack in the center, preheat the oven to 500°F to 550°F with a baking steel or stone inside. Make sure the oven is at least 500°F for a full 30 minutes before baking your pizza, in order for the steel or stone to preheat thoroughly.
- Divide the dough in half. Working with one piece at a time, transfer the dough to a well-floured surface.
- Stretch and fold it, as follows: Holding onto the dough at both ends, pull one end away from the other, then fold it back onto itself. Repeat on the other side so that all four corners of the dough have been stretched and folded.
- Pull the ends of the dough toward the middle, then turn it over. Using your fingers, pull the dough under itself to make a smooth, round ball with the seams tucked into the bottom. Repeat with the other piece of dough. Place each ball seam-side down into a floured bowl.
- Cover the bowls and allow the dough to proof (rise) for 45 minutes to an hour, while your oven preheats.
- Working with one piece at a time, transfer the dough to a well-floured work surface and dust the top with flour. Use your fingertips to gently depress the surface, being careful not to touch the outer edge of the crust; you want it to remain thick.
- Lift up the crust and use your knuckles to gently stretch it into a circle about 10" to 12" in diameter. Move it to a well-floured pizza peel or floured sheet of parchment.
- Lightly sauce the dough, then add your toppings of choice.
- Turn on the top broiler in your preheated oven and transfer the pie to the steel or stone. Be sure there's at least 8" of space between the surface of the pizza and the broiler.
- Gently slide the pizza (or pizza and parchment) onto the steel or stone. Bake the pizza for approximately 6 minutes on the steel (or 7 minutes on the stone), until bubbly and charred on the edges. Remove the pizza from the oven and top it with freshly grated Parmesan, if desired. Slice and serve the pizza immediately.
- Repeat with the remaining dough and toppings.


Leave a Reply